Some months ago STMicroelectronics gave out free STM32F4 Discovery boards. I was one of those few lucky (actually almost everyone got it) to get a free board. Last semester I used the board for my class project (Real Time and Embedded Operating Systems) along with Keil. I also have a netduino board which is my favourite of all dev boards I have because I can use Visual Studio and C#. I know the limitations of managed code running on metal because of the CLR’s overhead. But my applications are not real-time signal processing. Last week I accidentally bumped into a site http://netmf4stm32.codeplex.com/ and was pleasantly surprised that .NET MicroFramework was ported (or in the process) for STM32 boards. So why not try it? Well, also this time I made sure I document the whole process of doing this along with screenshots. The source of this work is taken from the post http://netmf4stm32.codeplex.com/discussions/400293. Thanks LouisCPro and the members of http://netmf4stm32.codeplex.com/team/view. The whole thing took me less than 2 hours (including installing Visual C# Express 2010). Here we go…….
Make sure you have the following
1) STM32F4 Discovery board
2) USB Micro and USB Mini cable (Yup, you need both)
3) STM32 ST-LINK Utility (to drop the bootloader to the discovery board. It also has the driver) http://www.st.com/web/en/catalog/tools/PF258168
4) Download stm32f4discovery.zip and STM32_WinUSB_drivers_(for_evaluation_purposes_only).zip from http://netmf4stm32.codeplex.com/
5) Visual C# Express or Visual Studio 2010 (not 2012 right now) http://www.microsoft.com/visualstudio/eng/downloads#d-2010-express
6) .NET MicroFramework SDK (this is for 4.2) http://netmf.codeplex.com/releases/view/91594
7) An LED (To test the hello blinky)
After you have installed everything (Yes, please install everything). Now connect the USB Micro cable

(I had a different firmware in there, that’s why its all lite up)
Once you plugged in the board it will start looking for driver. If you have installed the STM32 STLink utility, then it will automatically install the driver. If you missed it, please install it. Run the STM32 Utility (usually is located in C:Program Files (x86)STMicroelectronicsSTM32 ST-LINK UtilityST-LINK UtilitySTM32 ST-LINK Utility.exe for default installation).
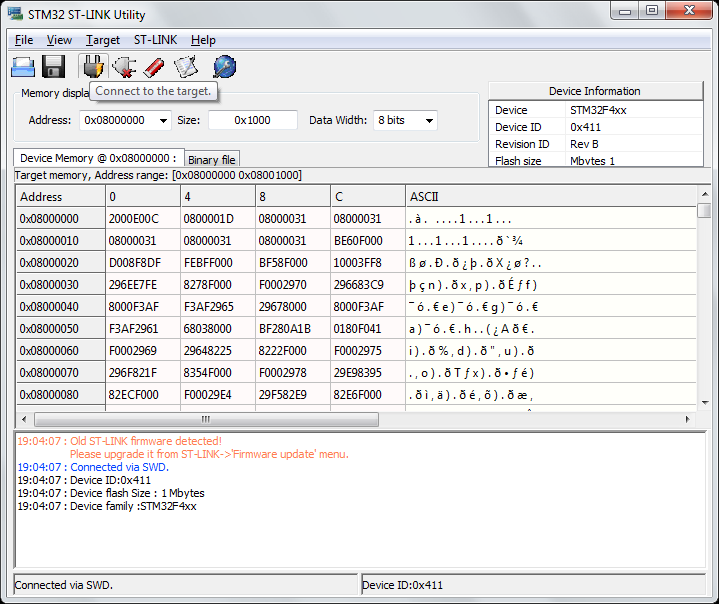
After you are connected to the utility, erase everything on the STM32F4 (don’t worry, you won’t brick anything) by following the screenshots below (yes delete both Chip and Sector, one after the other)
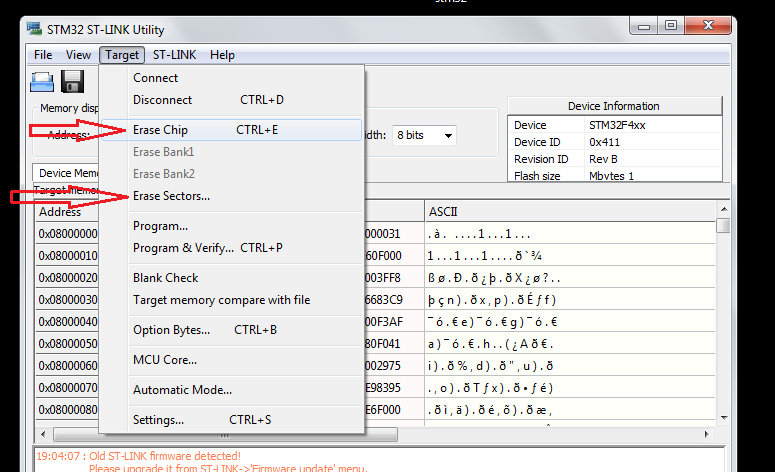
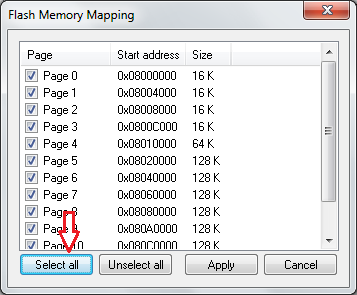
Now the chip is clean. Remember point 4 on the top of the page where you were asked to download 2 zip files? extract them and have them handy (we will be using it). In the stm32f4discovery.zip you will see 3 files: Tinybooter.hex, ER_Flash.hex and ER_Config.hex.
Using the ST Link utility download Tinybooter.hex into the chip (Screenshot below)
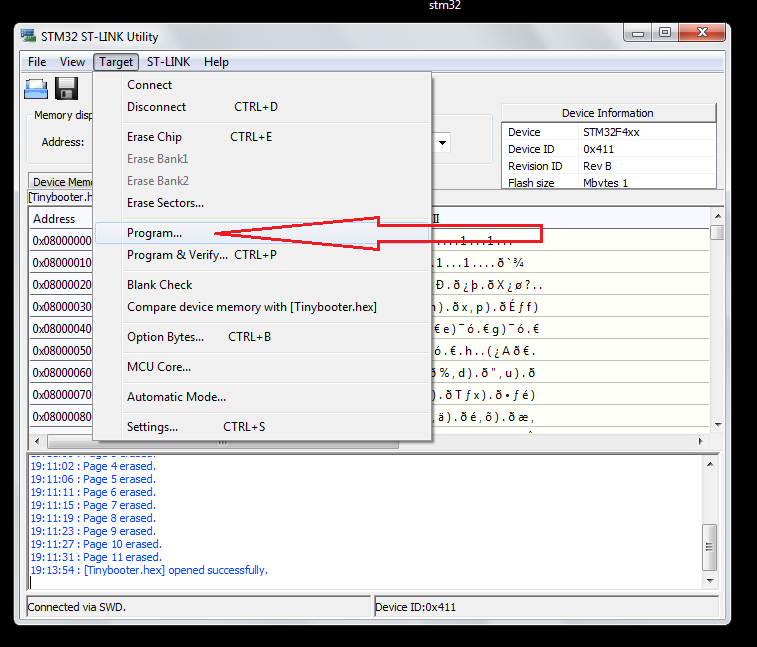
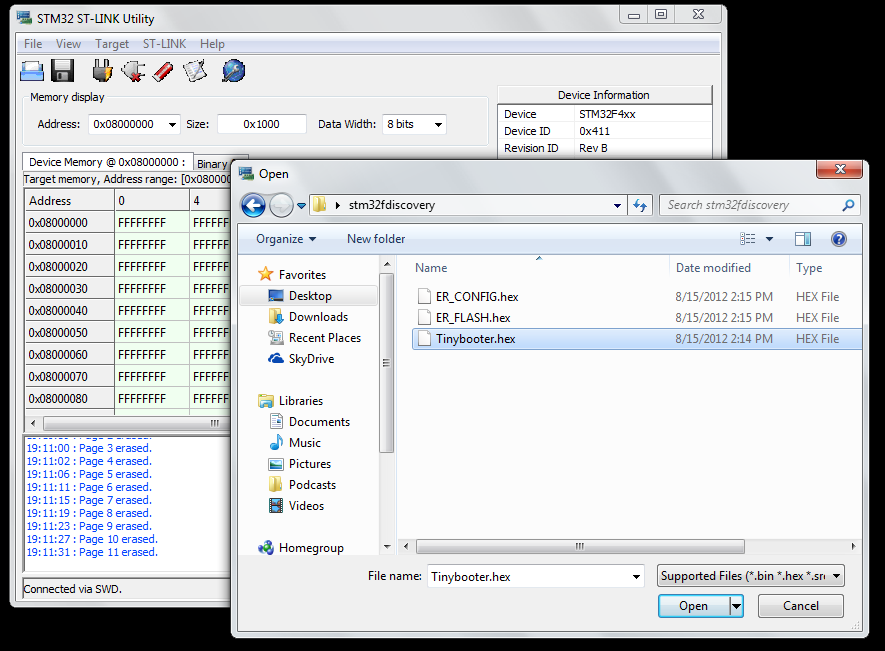
After you have successfully downloaded press reset button on the board (or just remove the usb and plug it in again). After you have uploaded the Tinybooter.hex, the Mini USB will act only as a power supply for our project. After you have reset your board now plug-in the USB Micro USB (the other USB). I used my phone charger cable. Most of the smart phone cables should be Micro USB.
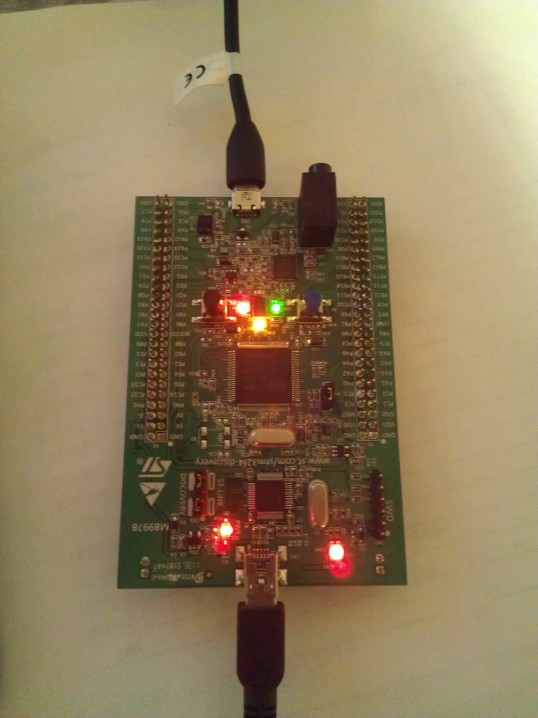
Once you connected the Micro USB, windows will start searching for driver and will fail. Now we got to install the driver we downloaded from the other zip file named “STM32_WinUSB_drivers_(for_evaluation_purposes_only).zip“. Follow the screen shots give below if you don’t know how.
Go to Devices and Printers from your Start menu and then
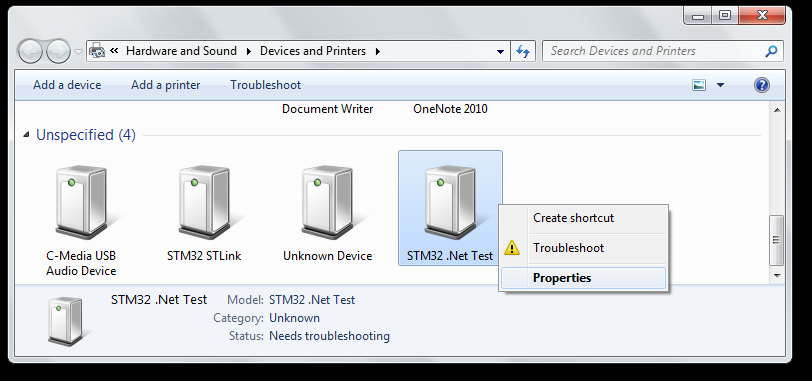
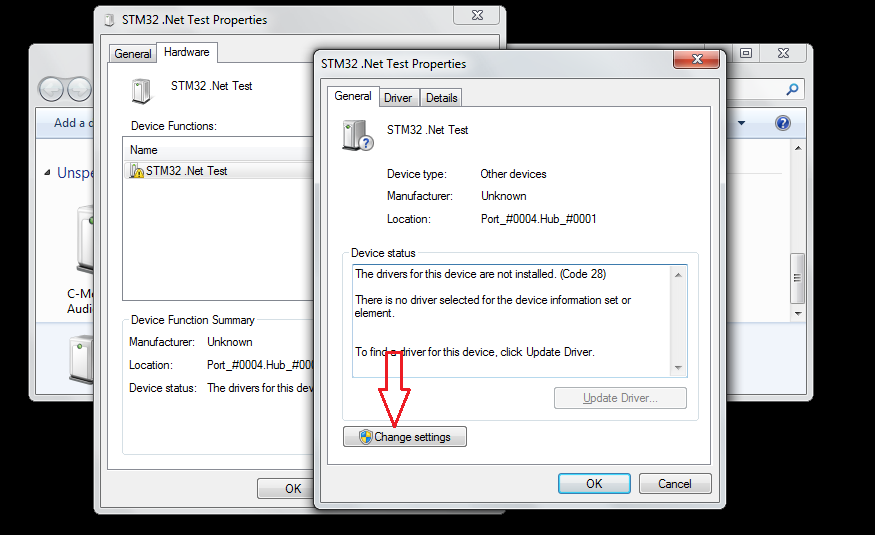
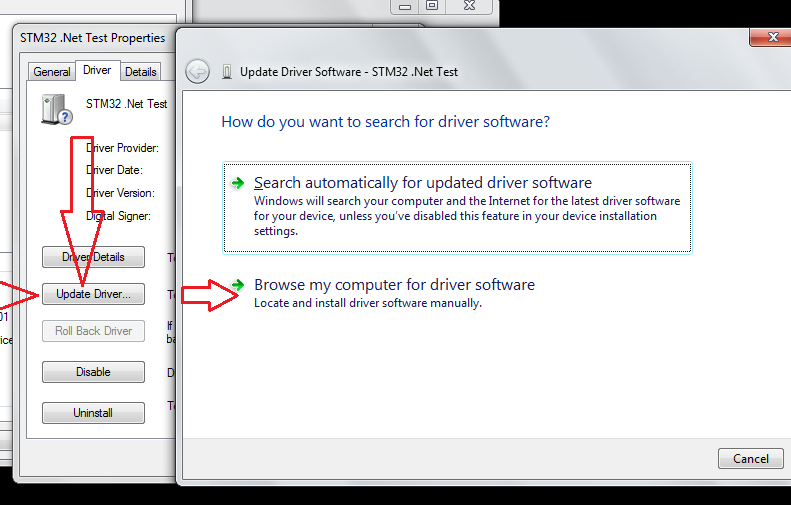
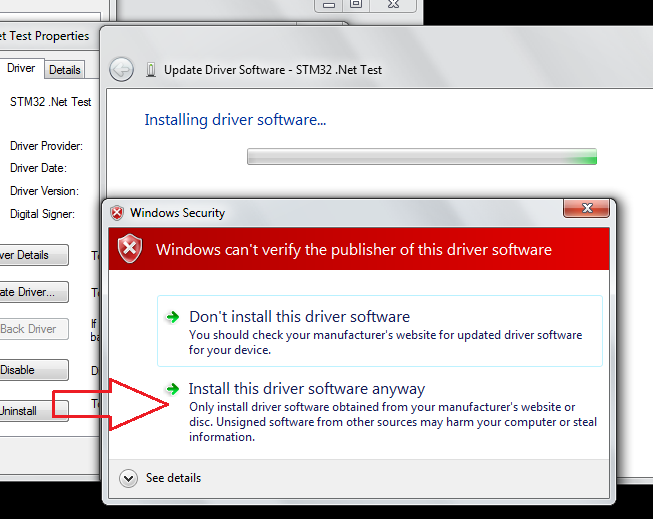
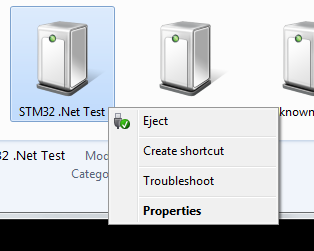
Now the MFDeploy should be able to see this board. MFDeploy is MicroFramework Deployer (duh). Using this software we’ll install the CLR on which our .net code will run. Alright, now launch MFDeploy.exe (you should be able to find it in C:Program Files (x86)Microsoft .NET Micro Frameworkv4.2ToolsMFDeploy.exe) which you should have got when you installed the SDK. To make sure MFDeploy can see the board do as shown below.
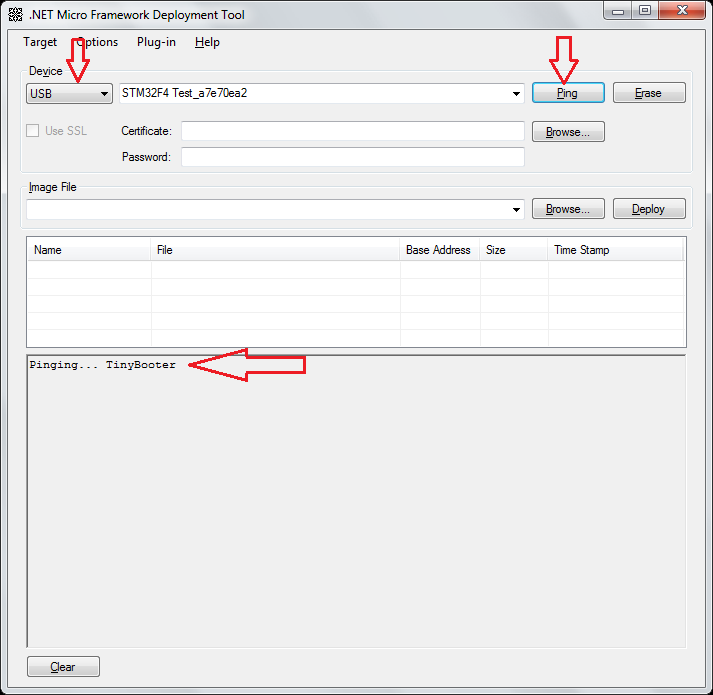
If you see the Ping the everything is good till this point. Now download the other 2 .hex (ER_Config.hex and ER_Flash.hex) files extracted from stm32f4discovery.zip file to the board using the MFDeploy as shown below


Reset the board.
Congratulations! You got a .NET Microframework board!
Now we need to test our board. So open your Visual C# Express/ Visual Studio. I am sure you should have installed the Microframework SDK. Select the project type as given below

Now we need to change the properties, so that the Visual Express/Studio will deploy to the hardware. So change the project properties as shown below

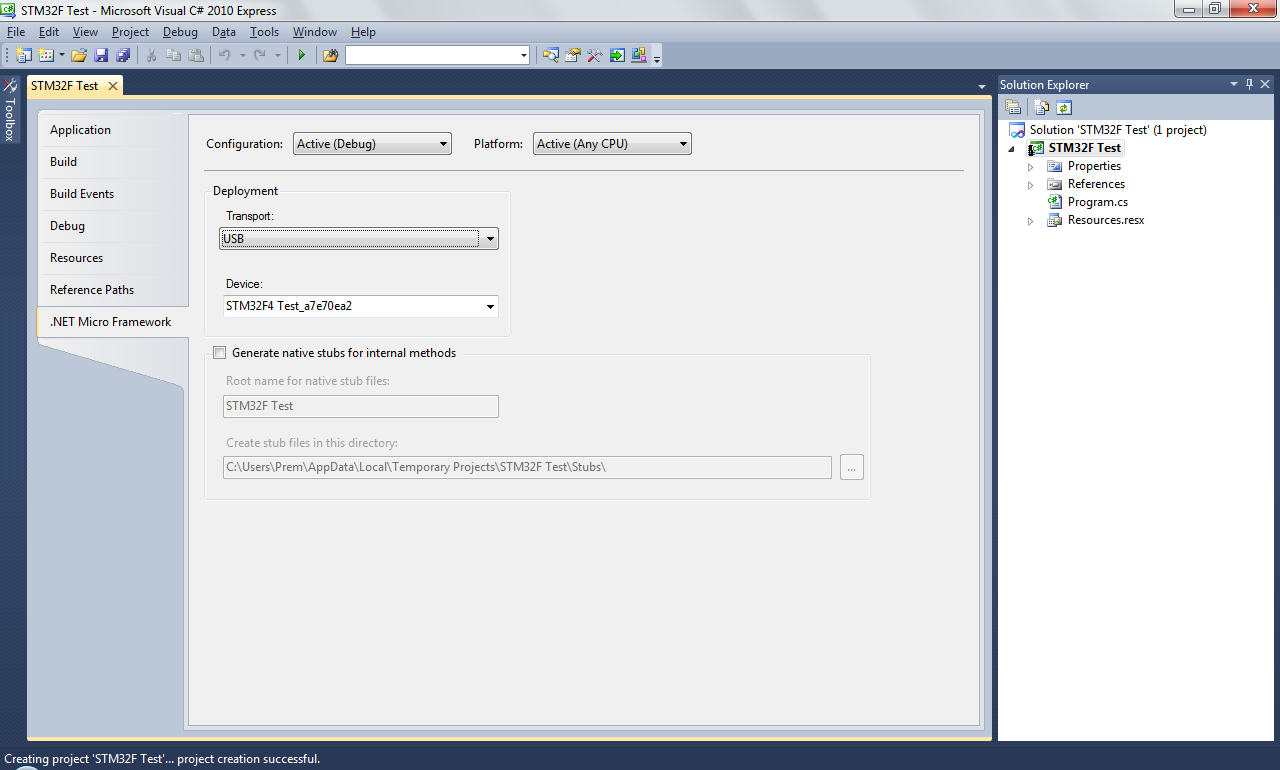
Now we need to add hardware class so that we can run a program to blink and LED.


Here is my test code
using System;
using System.Threading;
using Microsoft.SPOT;
using Microsoft.SPOT.Hardware;

namespace STM32F_Test
{
    public class Program
    {
        public static void Main()
        {
            OutputPort led = new OutputPort(Cpu.Pin.GPIO_Pin1, false); //PA1 on discovery board

            while (true)
            {
                led.Write(true);
                Thread.Sleep(500);
                led.Write(false);
                Thread.Sleep(500);
            }
        }

    }
}
Oh, to know the pin map follow this file “C:MicroFrameworkPK_v4_2DeviceCodeTargetsNativeSTM32ManagedCodeHardwareCPU.cs” which you will find if you installed the porting kit (not included in the list above)
Here is the video
[youtube=http://www.youtube.com/watch?v=waKveMdQq1o]
Hello,
this is a great installation guide.
Nevertheless I have problems when I am trying to install the USB driver (for evaluation purpose).
I am using windows 8.1 and the driver is just NOT installed.
I looked in the ini file and changed for the win 8 settings but still nothing happened.
So can you give me any help what I am doing wrong?
Thanks in advance
Thomas
In windows 8 and 8.1 for security reasons Microsoft does not allow users to install unsigned drivers easily. Search google for “windows 8 unsigned driver install” and that should help you.
@singularengineer
Hello,
thank you for your fast reply :).
Ok I have now installed the driver on my Win 8.1 machine following your hint.
When I now try to use MFDeploy from the 4.2 version I do not get any result from the pin, it just say pinging … and that’s it.
Anything idea what I still could have missed?
Thanks
Thomas
@Thomas
Hmm.. I can’t think of anything. Can you try it again? and let me know?
I am getting stuck at the step to setup the project properties. My installation of MS Visual C# 2010 Express does not have a side tab “.NET ” like in your screen shot. I made sure it is a console application but can’t find anything simmilar where to specify the hardware and I did install the microframework SDK (unless my visual C# didn’t pick that up?)
@Paul
It seems my problem started earlier with a step I missed:
I uploaded TinyBooter.hex but the “STM32.Net Test” never showed up under devices after unplugging/replugging etc. Only the “STM32 STLink” device appears.
Which means running MFDeploy does not Ping the device.
Is it because I am running a newer board (32F429IDiscovery)?
I was hoping these boards are similar enough to get something going with it using your steps.
Might be possible because of the new processor. Give it a try and ask in codeplex which might actually give an answer. mountaineer.org/netmf-for-stm32/ says it should not be a problem. Let me try to get the board and give it a try.
Hello,
thanks a lot for this demonstration but i have a problem : MFDeploy is not able to see the board. i Did all the previous step but in this step, i get this problem. Can u help me solve it please.
thanks
Working fine for MF 4.2. There is still no support for 4.3. Thats not good 🙁
Thanks Singular and bloggers. Just letting you know that it works with .NET framework 4.3. The stsw-stm32141 STM32F429 discovery .Net Micro Framework package (UM1676) includes some good examples including serial communication, AnalogInput, AnalogOutput, Pulse Width Modulation, animated graphics, and InterruptPort (similar to the Keil C examples). The graphics and text writing code is really useful. One thing I haven’t found is .net code to read/write SD card over USB host. Has anyone seen this?
Forgot to say, ST “UM1676 User manual Getting started with .NET Micro Framework on
the STM32F429 Discovery kit” has full step by step instructions on the setup (very similar to yours). The only thing that doesn’t work for me is Section 3 Erase Deployment Sector. It failed midway but recovered by doing full erase from ST-Link Utility.
Also forgot to mention my last two comments apply to STM32F429 Discovery (the one with the fabulous colour LCD). One thing none of the ST docs (even datasheet) mention, the screen is a touch screen. Great value for < $30!
@BenR
Ben,
Thanks!
This is a very old post. Things have changed a lot and I have moved on to other topics. Thanks for making a comment. If I find something new will definitely post a comment.
where you can find the ER_CONFIG.hex and ER_FLASH.hex to .Net Micro Framework 4.4?
Here’s a link http://www.st.com/web/en/catalog/tools/PF260087# Make sure you got the right controller.
Can i use that for tcp/ip connection ?