Remember the first GPIO post where we used the function __delay_ms() function? That’s a bad way to use delay. It will get the job done, but in a not so effective way. What happens when you call __delay_ms() function is, the controller will execute NOP() (which means No OPeration). But still NOP is an instruction, which means your controller is doing something, but nothing useful. If you can use that time to do some other operations, that will be awesome. If there are no operations to be done, at least put the controller to sleep, so that you will save some battery life.
With XC (and with pervious C18) compiler, we have a header file called “timers.h”. The header timers.h gives us the functions to reduce the number of lines of code. I strongly suggest read the datasheet and compiler documentation.
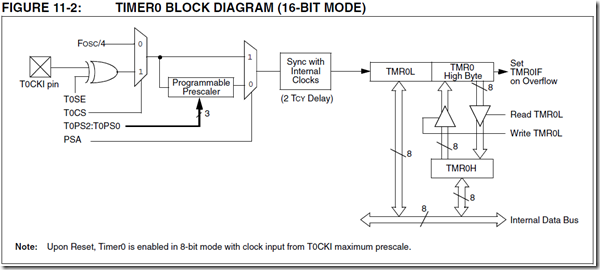
Since I am using PIC18F4550, there are 4 timers according the datasheet (from 0 – 3). I will be using Timer0 to blink a LED at 1Hz (on/off a second).
I have the following functions to configure and run the timer using timers.h
void OpenTimer0 ( unsigned char config);
void CloseTimer0 (void);
unsigned int ReadTimer0 (void);
void WriteTimer0 ( unsigned int timer0);
Step 1: Configure Timer0 (fill the config variable with settings)
Step 2: Enable interrupts (yes, we like to create an interrupt when timer reaches the limit)
Step 3: Configure the interrupt and start running the program.
The picture from the screenshot will give you an insight of our configuration setup.
An interrupt will happen when the timer overflows. So, when I say open timer, the timer will start counting from 0,1,2……….0xFF (for 8 bit timer) or 0xFFFF (for 16 bit timer). So an interrupt happens at 0xFF for 8 bit and 0xFFFF for 16 bit timer.
Please read the peripheral library documentation. Haven’t heard of it? (Its really bad of not reading documentation of a device or its development tools) well, when you install the compiler XC8 (or C18) you will find it in your C:\Program Files (x86)\Microchip\xc8\<compiler version>\docs. Also go through C:\Program Files (x86)\Microchip\xc8\<compiler version>\include\plib to find the available peripheral libraries and their code.
Note : When you use WriteTimer0(); function, please use HEX values as arguments. Like WriteTimer0(0xE17B); The program I’m going to show down is a 1 second timer based on timer0 and using interrupts.
for 8MHz oscillator and 256 prescalar, the effective instruction execution speed is (4*256)/8×106 which will give you 128uS (micro second) per instruction. So for 1 second 7812.5 (it is 1/128uS). Since we know interrupt happens only when the timer buffer overflows, for a 16 bit timer the preset value to achieve 1 second for overflow will be 65535 – 7813(roundup 7812.5) = 57723 which in HEX will be 0xE17B.
Now here is the code
#define _XTAL_FREQ 8000000 //The speed of your internal(or)external oscillator
#define USE_AND_MASKS

#include <xc.h>
#include "config.h"
#include <plib/timers.h>

int i = 0;
unsigned char Timer0Config;
void SetupClock(void);

void main(int argc, char** argv) {

    SetupClock(); // Internal Clock to 8MHz

    TRISBbits.RB4 = 0; //set RB4 as output
    LATB4 = 1;         //Make RB4 high when the program starts

    Timer0Config = TIMER_INT_ON & T0_16BIT & T0_SOURCE_INT & T0_PS_1_256 ;
    OpenTimer0(Timer0Config);
    WriteTimer0(0xE17B); //Please use HEX. Decimal don't work

    INTCONbits.TMR0IF = 0; //reset Interrupt Flag

    ei();     // This is like fliping the master switch to enable interrupt

    while(1) //infinite loop
    {

    }
}

void SetupClock()
{
    OSCCONbits.IRCF0 = 1;
    OSCCONbits.IRCF1 = 1;
    OSCCONbits.IRCF2 = 1;
}

void interrupt TimerOverflow()
{
    if(INTCONbits.TMR0IF == 1)
    {
        LATB4 = ~LATB4;
        INTCONbits.TMR0IF = 0;
        WriteTimer0(0xE17B); //Please use HEX. Decimal don't work
    }

}
