This will be the last of the XC8 series for PIC18. Next will be bunch of projects (hopefully I’ll get the time). ADC is the last topic. There are too many stuffs, but the point is read the datasheet. Datasheet tells you everything and my previous posts will give you an idea of linking datasheet with peripheral library and use in your application.
ADC in PIC18’s are of 10 bit resolution. Way too good for most of our needs. Before complaining about ADC not working, are you sure you read every word of the datasheet and understood it? ADC’s have a lot of configuration. Going for high sampling rate is not always good. You got to set the acquisition time for your ADC. Lot of people make mistake with the settings and sampling rate of the ADC. For my tutorial I’ll be using a potentiometer. Not a big deal with the sampling rate. But still will give you an idea of setting the interrupts and other features.
Read this application note that explains ADC for pic midrange in detail http://ww1.microchip.com/downloads/en/DeviceDoc/31021a.pdf
In order to set the ADC, these are the following steps
-
Set ADC clock
-
Set conversion time (TAD) – applicable if you see ADCON2 in the datasheet
-
Justification (right of left – padding zeros)
-
+Ve reference – can be either Vdd or voltage at pin AN3 (analog channel 3’s pin)
-
-Ve reference – can be either Vss or voltage at pin AN2 (analog channel 2’s pin)
-
Interrupt ON
- Note : All the above list may not be applicable to all controllers. Please read the datasheet.
In lot of places you would have seen polling method. So I wont be showing that. In our method the ADC will trigger an interrupt after conversion is complete.
According to peripheral library these are the functions we will be using
void OpenADC( unsigned char config, unsigned char config2, unsigned char portconfig)
How did I know it takes 3 arguments? according to library there are also OpenADC function with only 2 arguments? Well, read the datasheet and select your OpenADC with the available registers.
Here is my setting for OpenADC()
OpenADC(ADC_FOSC_2 & ADC_RIGHT_JUST & ADC_20_TAD, ADC_CH0 & ADC_INT_ON & ADC_VREFPLUS_VDD & ADC_VREFMINUS_VSS, ADC_0ANA);
My input is a potentiometer, so not a big deal with the settings. Select your TAD according to your requirement.
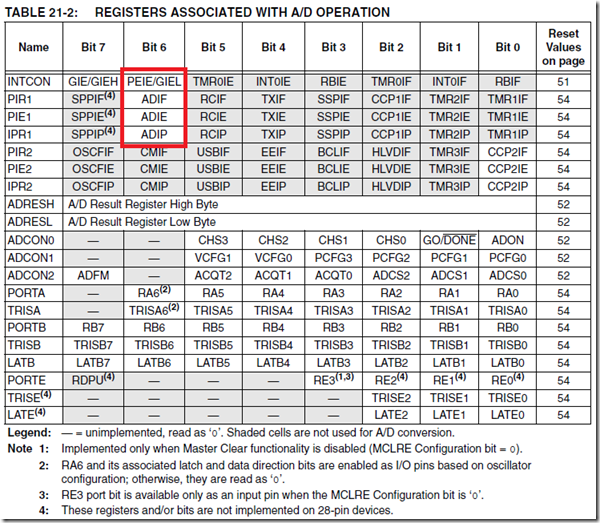
You have this awesome interrupt enabler that also setup the interrupt. Here is the list of registers affected
In order to setup the interrupt here is an awesome macro given in adc.h
#define ADC_INT_ENABLE() (PIR1bits.ADIF=0,INTCONbits.PEIE=1,PIE1bits.ADIE=1)
Here’s the complete ADC code
/*
 * File:   main.c
 * Author: Singular Engineer
 *
 * Created on June 1, 2013, 12:10 AM
 */
#define _XTAL_FREQ 8000000 //The speed of your internal(or)external oscillator
#define USE_AND_MASKS

#include <xc.h>
#include <stdlib.h>
#include "config.h"
#include <plib/usart.h>
#include <plib/adc.h>

unsigned char UART1Config = 0, baud = 0;
unsigned char MsgFromPIC[] = "\r\nADC value is :";
int ADCValue = 0;
unsigned char ADCStringVal[4];
void SetupClock(void);

void main(int argc, char** argv) {

    SetupClock(); // Internal Clock to 8MHz

    TRISAbits.RA0 = 1;
    TRISCbits.RC6 = 0; //TX pin set as output
    TRISCbits.RC7 = 1; //RX pin set as input

    //Configure UART
    UART1Config = USART_TX_INT_OFF & USART_RX_INT_ON & USART_ASYNCH_MODE & USART_EIGHT_BIT & USART_BRGH_HIGH ;
    baud = 51;
    OpenUSART(UART1Config,baud);

    //Configure ADC
    OpenADC(ADC_FOSC_2 & ADC_RIGHT_JUST & ADC_20_TAD, ADC_CH0 & ADC_INT_ON & ADC_VREFPLUS_VDD & ADC_VREFMINUS_VSS, ADC_0ANA);

    ADC_INT_ENABLE(); //Easy ADC interrupt setup


    ei();       //remember the master switch for interrupt?

    //Start ADC
    ConvertADC();

    while(1) //infinite loop
    {

    }
}

void SetupClock()
{
    OSCCONbits.IRCF0 = 1;
    OSCCONbits.IRCF1 = 1;
    OSCCONbits.IRCF2 = 1;
}

void interrupt ADCInterrupt()
{
    //check if the interrupt is caused by ADC
    if(PIR1bits.ADIF == 1)
    {
        ADCValue = ReadADC();
        putsUSART(MsgFromPIC);
        putsUSART(itoa( ADCStringVal, ADCValue,10)); //convert to string

        //Reset interrupt flag and start conversion again
        ADIF = 0;
        ConvertADC();
    }
}
And the output looks like


